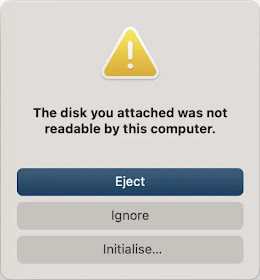
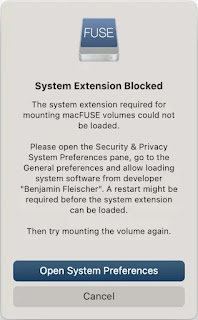
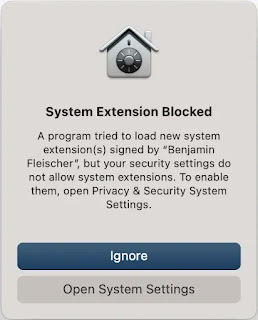
How to mount and access as read/write BitLocker-encrypted partitions, in macOS 13.1 Ventura, with Apple Silicon (ARM64).
You may need to do these 2 things first to allow the macfuse kext kernel extension to be installed.
1. Start up your computer in macOS Recovery by long pressing the power button once it's powered off -> Options -> Startup Security Utility -> select Macintosh HD -> Security Policy... :
- Change the security policy from "Full Security" to "Reduced Security" and tick "Allow user management of kernel extensions from identified developers".
- Open the Terminal (will open as root after prompting for admin password) and run "csrutil disable" to disable System Integrity Protection. This step is not required for dislocker.
brew install --cask macfuse
brew install gromgit/fuse/dislocker-mac
brew install gromgit/fuse/ntfs-3g-mac
brew install coreutils #optionalmkdir -p ~/mnt/dislocker/WINDOWS ~/mnt/WINDOWS
mkdir -p ~/mnt/dislocker/STORAGE ~/mnt/STORAGE
sudo dislocker-fuse -r -v -V /dev/disk4s1 -pXXXXXX-XXXXXX-XXXXXX-XXXXXX-XXXXXX-XXXXXX-XXXXXX-XXXXXX -- ~/mnt/dislocker/WINDOWS/
sudo ntfs-3g -o uid=$(id -u),gid=$(id -g),loop,ro,local,allow_other ~/mnt/dislocker/WINDOWS/dislocker-file ~/mnt/WINDOWS/sudo dislocker-fuse -v -V /dev/disk4s1 -pXXXXXX-XXXXXX-XXXXXX-XXXXXX-XXXXXX-XXXXXX-XXXXXX-XXXXXX -- ~/mnt/dislocker/WINDOWS/
sudo ntfs-3g -o uid=$(id -u),gid=$(id -g),loop,local,allow_other ~/mnt/dislocker/WINDOWS/dislocker-file ~/mnt/WINDOWS/kextstat | grep -v com.apple
Executing: /usr/bin/kmutil showloaded
No variant specified, falling back to release
Index Refs Address Size Wired Name (Version) UUID <Linked Against>
256 0 0xfffffe0006f24000 0x18b0 0x18b0 io.macfuse.filesystems.macfuse (2113.20) XXXXXXXX-XXXX-XXXX-XXXX-XXXXXXXXXXXX <7 5 4 3 1>mount
/dev/disk3s3s1 on / (apfs, sealed, local, read-only, journaled)
devfs on /dev (devfs, local, nobrowse)
/dev/disk3s6 on /System/Volumes/VM (apfs, local, noexec, journaled, noatime, nobrowse)
/dev/disk3s4 on /System/Volumes/Preboot (apfs, local, journaled, nobrowse)
/dev/disk3s2 on /System/Volumes/Update (apfs, local, journaled, nobrowse)
/dev/disk1s2 on /System/Volumes/xarts (apfs, local, noexec, journaled, noatime, nobrowse)
/dev/disk1s1 on /System/Volumes/iSCPreboot (apfs, local, journaled, nobrowse)
/dev/disk1s3 on /System/Volumes/Hardware (apfs, local, journaled, nobrowse)
/dev/disk3s1 on /System/Volumes/Data (apfs, local, journaled, nobrowse, protect)
map auto_home on /System/Volumes/Data/home (autofs, automounted, nobrowse)
dislocker-fuse@macfuse0 on /Users/user/mnt/dislocker/WINDOWS (macfuse, synchronous)
/Users/user/mnt/dislocker/WINDOWS/dislocker-file on /Users/user/mnt/WINDOWS (macfuse, local, synchronous)gstat -c %u ~/mnt/WINDOWS/
501
gstat -c %g ~/mnt/WINDOWS/
20
Still "~/mnt/dislocker/*" will belong to root when dislocker-file is mounted, however the NTFS filesystem can be read/write as unprivileged user.
gstat -c %u ~/mnt/dislocker/
501
gstat -c %g ~/mnt/dislocker/
20
sudo gstat -c %u ~/mnt/dislocker/WINDOWS
0
sudo gstat -c %g ~/mnt/dislocker/WINDOWS
0
10. The macFUSE ntfs-3g volume icon should appear on Desktop as well, and you can double click it to open and access it. Also will be listed under the Locations panel at the left:
11. Read and write permissions
Clicking in Finder on the volume name "macFUSE Volume 1 (ntfs-3g)" would equal to browse the filesystem to "~/mnt/WINDOWS/", (or corresponding mount point name). You will be able to access such directory and all of its subfolders from Terminal or third-party shell, like iTerm, with read, write and execute permissions.
However, although Finder will display the volume in Locations, Finder will only display directories (folders) from that mount point down recursively, and won't allow to access or list any file, either for Finder itself or any other desktop application, like "Hex Fiend".
This is because once the dislocker file is mounted to a directory, the mounting directory (WINDOWS) changes its permissions from user owner to root owner, and reverts after the unmount. This is because Finder does not allow to list files on directories owned by root, even if the permissions are rwx for everyone (777 in octal). As said, you can still access everything under the mounting directory as user for any operation.
Clearly this is a bug in Finder #bugs
Demonstration of permissions, starting with nothing mounted:
sudo tree -L 3 -u -g -p ~/mnt/
[drwxr-xr-x user     staff   ]  /Users/user/mnt/
├── [drwxr-xr-x user     staff   ]  WINDOWS
└── [drwxr-xr-x user     staff   ]  dislocker
    └── [drwxr-xr-x user     staff   ]  WINDOWS
sudo dislocker-fuse -v -V /dev/disk4s1 -pXXXXXX-XXXXXX-XXXXXX-XXXXXX-XXXXXX-XXXXXX-XXXXXX-XXXXXX -- ~/mnt/dislocker/WINDOWS/
sudo tree -L 3 -u -g -p ~/mnt/
[drwxr-xr-x user     staff   ]  /Users/user/mnt/
├── [drwxr-xr-x user     staff   ]  WINDOWS
└── [drwxr-xr-x user     staff   ]  dislocker
    └── [dr-xr-xr-x root     wheel   ]  WINDOWS
        └── [-rw-rw-rw- root     wheel   ]  dislocker-file
sudo ntfs-3g -o uid=$(id -u),gid=$(id -g),loop,local,allow_other ~/mnt/dislocker/WINDOWS/dislocker-file ~/mnt/WINDOWS/
sudo tree -L 2 -u -g -p ~/mnt/
[drwxr-xr-x user     staff   ]  /Users/user/mnt/
├── [drwxrwxrwx user     staff   ]  WINDOWS
│   ├── [drwxrwxrwx user     staff   ]  $RECYCLE.BIN
│   ├── [drwxrwxrwx user     staff   ]  System Volume Information
│   ├── [-rwxrwxrwx user     staff   ]  bookmarks.html
│   ├── [drwxrwxrwx user     staff   ]  movies
└── [drwxr-xr-x user     staff   ]  dislocker
    └── [dr-xr-xr-x root     wheel   ]  WINDOWS
Here we can see, that as soon as we mount each of the filesystems, directories change owner and group to more privileged values, hence Finder doesn't allow to display files or access GUI *.app to it.
12. To unmount both filesystems it's pretty simple (in reverse order):
sudo umount ~/mnt/WINDOWS
sudo umount ~/mnt/dislocker/WINDOWS
13 Performance tests
The SSD is in SATA to USB 3.0 enclosure, connected to USB 3 ports. Running some read and write tests in Windows 11 and macOS:
Cygwin under Windows 11 (MSi computer):
$ pv BaseSystem.img > /dev/null
2.00GiB 0:00:05 [ 359MiB/s] [=========================================================>] 100%
$ pv mac_hdd_ng.img > /dev/null
 101GiB 0:04:46 [ 364MiB/s] [=========================================================>] 100%
$ dd if=/dev/zero bs=100M count=100 | pv > file
100+0 records in[ 147MiB/s] [                                           <=>            ]
100+0 records out
10485760000 bytes (10 GB, 9.8 GiB) copied, 61.2093 s, 171 MB/s
9.77GiB 0:01:01 [ 163MiB/s] [                                           <=>            ]
iMac M1 with dislocker connected to Thunderbolt or USB-C port:
# dd if=/dev/disk5 bs=10M count=1000 | pv > /dev/null
1000+0 records in 135MiB/s] [                                           <=>            ]
1000+0 records out
10485760000 bytes transferred in 74.401004 secs (140935733 bytes/sec)
9.77GiB 0:01:14 [ 134MiB/s] [                                           <=>            ]
% pv BaseSystem.img > /dev/null
2.00GiB 0:00:21 [96.5MiB/s] [=========================================================>] 100%
% dd if=/dev/zero bs=100M count=100 | pv > file
100+0 records in[27.8MiB/s] [                                           <=>            ]
100+0 records out
10485760000 bytes transferred in 362.403237 secs (28933958 bytes/sec)
9.77GiB 0:06:02 [27.6MiB/s] [                                           <=>            ]
With iMac the problem is already that accesses the drive or block device much slower than on Windows. Maybe due to some physical limitation of the USB-C ports of the Mac or drivers issue.
Links
- Make NTFS writable again (on OSX) (only for Intel-based MACs)
- Detecting that OSXFUSE is installed
- Kernel extensions in macOS
- MacOS High Sierra KEXT Loading - Are there any ways to cancel user approval?
- Revoking third-party kext permission
- User Approved Kernel Extension Loading…
- MacOS High Sierra KEXT Loading - Are there any ways to cancel user approval?
- Revoking trust for kernel extensions: How?
- Unable to create folder in root of 'Macintosh HD'?
- How to enable System Extensions on Apple M1
- How to get the numeric group owner of a file?
- Is there a whoami to find the current group I'm logged in as?


No comments:
Post a Comment
Note: Only a member of this blog may post a comment.